Showing posts with label Sewing. Show all posts

22 September 2012

Matty's MOPS Bag

My son has a small obsession with tractors.  I blame it on spending the summer in the midwest (and the fact that my dad works for John Deere).  Anyway, I mentioned a few posts ago that I've been wanting to make a small bag for Matty to take with him to church daycare during my MOPS meetings.  Nothing too fancy; just a bag to hold some diapers, a sippy cup, and "bway bway" (his blankie).  I have a TON of leftover John Deere fabric from his birthday party, and this was yet another project I could do to try and use some of it up!

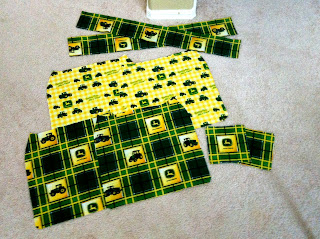
So here we go.  I free-handed the pattern for this bag because I had made something like it before, and I knew roughly the dimensions I wanted it to be.  So I cut 2 pieces out of my liner fabric and 2 pieces out of my outer fabric, both approximately 15 cm by 19 cm.  I then cut out two squares (about 6 in X 6 in) for an inner pocket, and two pieces ( 4 in X 29 in) for straps.  I also cut out two pieces of batting the same size as my bag and one piece as long as my strap, but it isn't pictured.


I started with the pocket, only because I wanted one.  This step is completely optional.  Take your two squares, put them right sides together, and then sew around all 4 sides, leaving a small opening in order to pull it right side out.


Pull ride side out and press flat, tucking in the edges of your opening.  I top-stitched across the top of the pocket, purely because I liked how it looked.  It's not necessary to do so.  


I pinned the pocket to the right side of one of my pieces of liner fabric.


I then top-stitched around the three sides of the pocket, obviously leaving the top side open.  I actually did a double stitch around it, not only because it looks nice, but also because it gives your pocket a little bit more strength.


I then took my two pieces of liner fabric and pinned them right sides together.  I stitched around the two sides, leaving the top open and also a small opening at the bottom in order to turn right side out.


I then took my batting pieces and put them against the wrong sides of my outer fabric, placing the two outer fabric pieces right side together.  (See picture below if this doesn't make sense).


I did the same thing to these pieces of fabric, sewing along the sides but leaving the top open, as well as a small hole at the bottom for flipping.  Afterwards, I turned it right-side out, and pressed flat.


I then slid my outer fabric into my liner fabric, so that all right sides were facing each other (see picture if this is unclear).


I stitched around the top, binding all layers of the fabric together.


I turned the whole thing right-side out but, before stuffing my lining into the bag, I hand-stitched the opening in the bottom closed.  Some might say this isn't necessary since no one will really be looking at the lining anyway, but once you lose something through that tiny little hole just once, you'll realize it IS necessary to sew it up.  So save yourself a headache, take 10 minutes, and stitch up the opening!  Then push the lining into the bag and press.  Top stitch around the top of the bag and hand-stitch closed the opening in the bottom of the bag.


Take your two pieces of strap fabric and put them right side together, also pinning the piece of batting to one side.  If you're going to use this to carry books or other heavy items, you might consider using two pieces of batting for the strap.  But, for carrying diapers and the like, I thought one piece was enough.


Stitch around the long sides, turn right-side out, press, and top stitch all around, turning in open edges.


You can attach the straps to the bag however you'd like.  I chose to fold my at an angle and attach that way.  Mainly because I was planning on decorating the ends with a button and didn't want the strap to be poking out from behind the button.


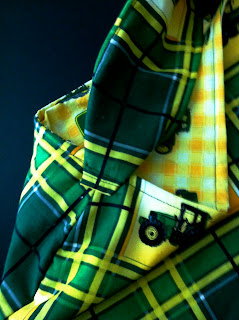
Hard to see in this picture, but I hand-stitched two buttons to either side of the bag right below the strap.  You don't have to do this step, but I think it does add a nice touch to the finished bag.


Happy sewing!
17 September 2012

A Sunday Night Allergy Attack Project

We are fighting a serious case of the crud in my house this weekend.  Well, MJ is fighting a case of the crud.  Mine seems to be more allergy-related.  Whatever the case, it's been a "staying in your pjs-hair pulled back-no contacts-drugged up on Benadryl" kind of weekend.  And, as some of you may know, it doesn't take much for me to get cabin fever.  Only two days of being stuck at home, and I was going a little stir crazy.  That meant it was time to pull out the sewing machine.

MJ and I started MOPS this year, and I wanted to make him a little bag that I could drop off with him at childcare for diapers, clothes, etc.  A full-up diaper bag just seemed too much for the task.  AND I had some super cute John Deere fabric left over from his birthday extravaganza that I needed to use up.  However, the more I looked at this fabric, the girly-er I found it.  It's supposed to be "bandana" type material, but the little swirls and flowers just made it look too feminine for a boy's bag.  So I decided to use it in my first attempt at a hobo bag instead, which I'd always wanted to try.  Sorry, MJ.  Your bag will have to wait a few more days. :)

Anyways, I started out with about two yards of fabric and, from it, I cut out two squares, each 27" X 27", as well as 4 strips of 3" X 10" and one 4" X 10" strip.  


From there, I put large squares RIGHT SIDES together.  I pinned them, leaving a 4" gap in the center of one side.  


Sew around the squares, using a 1/2" seam allowance, leaving the 4" gap open.  Turn the squares right side out and press flat, folding in the opening about a half inch.  

Next take your 4" X 10" strip and fold it in half, making it a 4" X 5" square.  Sew all around, leaving an opening to turn it right side out.  


Flip it right side out, press it, and top stitch all the way around.  Top stitching is not my greatest strength but hey--practice makes perfect, right?


Place your now-finished 4" X 5" strip about 1" into the gap in your large squares.  Pin it in place, then top stitch around the entire thing. 


Next, take the opposite three sides (the ones without the strip coming out of it) and sew a 2" pleat in the center of each.  This was my first time attempting pleats, but it really wasn't that hard.  You simply fold and sew.  The picture isn't very good.  Google it if you need more specific instructions. :)


Next, take your 3" X 10" strips and fold them in half length-wise.  Sew, leaving one end open to turn it right side out.  Press, and top stitch.  Honestly, this is what took me the longest out of the entire project. I hate turning skinny pieces of fabric inside out.  UGH.  My advice is to have a chopstick handy.


Finally, take your handles and pull one corner through about 3".  Fold the corner down and tie tightly with one of your strips.  Do this to all four corners.


And there you go.  A hobo bag.  Pretty easy.


Happy sewing!

08 November 2011

So I Got Bored Today. . .

It's only taken 4 months of living in Vegas to realize there are only two seasons:  hot and windy and cold and windy.  Now that it's moving into the "cold and windy" phase, I've been worried about MJ getting chilly on our morning walks.  It's not that it's extremely cold, but that wind has a BITE to it and, well, not taking a walk is just not an option with a certain Oskar dog in the house.  So I started looking into car seat covers and was blown away:  we're talking $50 to $100 for a nice, pretty car seat cover!  Ridiculous! It's nothing more than a blanket with some straps on it. . . which got me to thinking. . . I could make one!  I had some beautiful Vera Bradley fabric I had gotten while I was still in Korea (I miss Happy Quilt) and, luckily, some matching fabric.  A quick Google search for directions and a few hours later, I had my car seat cover.  Here's a look at how I did it if you're interested in making one for yourself or someone else (it would make a quick and easy baby shower gift!)

Here is the fabric I chose for my project.  You need about a yard and a half of each.


First cut out two strips of fabric from each pattern measuring 9" X 3".  These will be the straps that hang on your car seat.  Set aside.  Then, cut each fabric into a square yard piece.  Depending on your car seat, you may need to alter the size (perhaps 40" X 34", but a yard squared worked nicely for me).  Lay your large squares WRONG SIDES TOGETHER on your working surface.  Make sure you line them up precisely.  Use a bowl to round the edges of your squares.  I only wanted a slight rounding so used a small cereal bowl.  You could absolutely leave it as a square, but I think the round corners had a nice touch. :)


After that, put your fabric squares RIGHT SIDE together and sew around the edges, leaving a space open to turn your fabric right-side out when finished.


After turning right-side out, iron it so it lays flat then top stitch around, making special care to sew the hole you left open during the original stitching.


Next up, the straps.  You'll sew these exactly like the larger pieces.  Take the pieces of fabric and put them WRONG SIDES together and then sew, again leaving a hole open to turn it right-side out.  Turn it right-side out, iron flat, then top stitch.


Next comes the velcro.  If you're buying specifically for this project, I'd recommend getting the NON-sticky kind; the sticky kind gums up your needle.  However, all I had was the sticky kind so I made due. Take the rough side and sew it to the top of the inside fabric; take the soft side and glue it to the opposite end of the outside fabric.  Sound confusing but it's not.  This picture should help explain:


Next, you'll need to figure out where exactly you want your straps.  I placed my cover on the car seat to make an estimate.  I pinched the area of fabric where I wanted it and stuck a pin in it to mark it.  After measuring, it ended up being about 12.5" from the top of the cover, and each strap was about 10" apart.  


Next, I sewed the straps in place using a rectangular sew and then zig-zagging across the middle for extra strength.  Viola!  A car seat cover!


Such an easy, quick, and cute project.  I started this around 2:00 this afternoon and was done by 6:30. . . and that's with a break for a Matty feeding, a walk with both boys, and dinner for myself.  And tomorrow morning, Oskar and I can enjoy our walk knowing that MJ is warm and snug inside his car seat. :)

20 March 2011

A Cure For (or at least Distraction From) The Blues

I've been feeling a little blue lately. Now, I don't want anyone to freak out--I don't have pre-partum (is that a word?) depression or anything. I've just been feeling a little off. It always happens around this time of year. The weather starts turning warmer so I get antsy for summer, but it's not quite warm enough to do those summer-y things (plus, two days later the temps are back in the 30s). To me, this is when living in Korea is most difficult. I long to just drive on some back road with the windows down and ENJOY being outside. This is not an option here, for many, many reasons (pollution and traffic, just to name a few), so this adds to my restlessness.

But, I will be honest, this season in my life has definitely given fuel to my end-of-winter blues. PCS season is upon us and, especially with this next upcoming change of station, I have emotions so mixed that I don't know how I feel about it from one day to the next. I am both excited and terrified about moving back to America, and knowing I will have to do it without the community of friends I have come to love over the past 5 years is extremely hard. On top of that, the uncertainty that is surrounding our move in regards to my pregnancy has my stomach in knots. Where will I have the baby? Will Jonathan be there? So many unanswered questions. . .

This past weekend has been especially hard. It was the weekend of the Seoul marathon. As some of you may know, I was training for the half-marathon before I got pregnant. I was up to 10 miles before the doctor called knock-it-off, so I know that finishing the the half-marathon was a goal I definitely could have achieved. Granted, I know I DIDN'T run it for a very good reason, but it's still hard to see a day come to pass when you know you could have achieved one of your goals. I wanted so badly to be there to cheer on my friends who were still running but, with Jonathan gone, I had no one to watch Oskar, and I was unfortunately stuck at Osan for another weekend.

All of these things were going through my brain Friday night as I struggled to sleep, and I woke up Saturday morning realizing why pregnant ladies "nest": they need projects or else their pregnant lady brain will drive them INSANE! I couldn't see spending another weekend mulling over all of the above drama, but nesting is not quite an option for me since we are leaving before the baby is born. However, I realized, I did need a project---desperately. Then, I remembered the cute skirts my friend Chris had sewn for her two little girls (check out her blog about it here), and her mentioning in passing how they would make GREAT maternity skirts. Project question solved.

First things first. Measurements and a pattern, made simply out of pieces of computer paper taped together:


Next up, some beautiful material from Happy Quilt that I loved but couldn't figure out what to do with. I cut six of my pattern pieces out of the material.


Next I sewed each piece together wrong sides together until I created a "tube" of fabric.


Then, I turned the skirt wrong side out and sewed each seam again. This created 'french seams' all around the skirt.


After heming and top-stitching the bottom of the skirt, I took some elastic that measured about an inch smaller than my hip measurement and stitched it together to make a loop.


I then pressed and folded over the top of the skirt, encasing the elastic, and top-stitched around the top of the skirt to hold the elastic in place. Viola'! A skirt!


The finished skirt on me. Don't mind the mis-matching colors. My red IU shirt didn't QUITE match the fabric, but I wasn't going to change my ENTIRE outfit just for a picture. I'm pregnant and lazy, remember?


Knowing my luck, I'll grow out of it before the weather gets warm enough to wear it, but at least it was easy enough to make that I can make another one if I need to. But it looks like I'll need to make another trip to Happy Quilt. . .

25 February 2010

More Rainy Days

Another rainy, gloomy day in Korea. The constant downpour makes me antsy and depressed, so I figured I'd share some sunshine with you all (at least, its sunshine to me): new sewing projects! :) My latest was a fabric covering for my commissary bag. Now, I'm all about going green . . . but really, do you have to be ugly about it? I still wanted the strength of the original material so I decided to just COVER it with something a little prettier. Here's the before picture:


And here is the after picture:


I've got more fabric in this same color scheme so I can cover another one of our bags. Since we have four of them, I promised Jonathan I'd leave two alone so he wouldn't have to look "girly" every time he went and got groceries. :)

Hope you're all having a fantastic week!


08 January 2010

Little Suzy Home-Maker

One of my best friends here in Korea is amazingly crafty . . . and she's definitely given the bug to me. So, for Christmas, Jonathan was sweet enough to get me my very own sewing machine. I'm still learning the in's and out's of the machine (since the extend of my sewing knowledge came during 8th grade Home Ec class), but I have done a few projects already. This over-the-shoulder tote was my very first project:


Next I made this wine bottle gift bag:


The fabric isn't the prettiest, but it was my "play" fabric, and I was just excited that you could tell what things were supposed to be once I was finished! Here's hoping I continue to improve!